
Exception in C#
An application may encounter an error during the execution. When an error occurs, either CLR or program code throws an exception which contains necessary information about the error. There are two types of exceptions in .Net, exceptions generated by the executing program and exceptions generated by the CLR.
C# includes built-in classes for every possible exception. All the exception classes are directly or indirectly derived from the Exception class. There are two main classes for exceptions - SystemException and ApplicationException. SystemException is a base class for all CLR generated errors whereas ApplicationException serves as a base class for all application related exceptions, which you want to raise on business rule violation.
The following is a hierarchy of some of the exception classes in .Net:
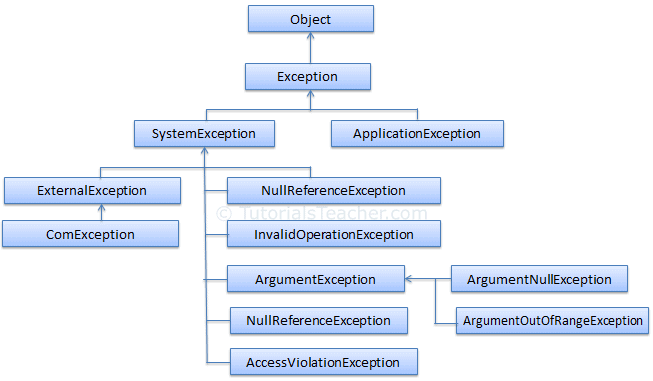
As you can see in the above figure, SystemException class is a base class for all the exception that can occurs during execution of the program. No other class derives ApplicationException class by default, because you as a programmer need to derive this class to create your own exeception classes as per the business rules.
The following figure shows how NullReferenceException is thrown in Visual Studio debug mode, when it accesses a property of a null object at runtime:

Important Exception Classes:
The following table lists important exception classes available in .Net.
| Exception | Description |
|---|---|
| ArgumentException | Raised when a non-null argument that is passed to a method is invalid. |
| ArgumentNullException | Raised when null argument is passed to a method. |
| ArgumentOutOfRangeException | Raised when the value of an argument is outside the range of valid values. |
| DivideByZeroException | Raised when an integer value is divide by zero. |
| FileNotFoundException | Raised when a physical file does not exist at the specified location. |
| FormatException | Raised when a value is not in an appropriate format to be converted from a string by a conversion method such as Parse. |
| IndexOutOfRangeException | Raised when an array index is outside the lower or upper bounds of an array or collection. |
| InvalidOperationException | Raised when a method call is invalid in an object's current state. |
| InvalidCastException | Raised when incompitible types are being converted. |
| KeyNotFoundException | Raised when the specified key for accessing a member in a collection is not exists. |
| NotSupportedException | Raised when a method or operation is not supported. |
| NullReferenceException | Raised when program access members of null object. |
| OverflowException | Raised when an arithmetic, casting, or conversion operation results in an overflow. |
| OutOfMemoryException | Raised when a program does not get enough memory to execute the code. |
| StackOverflowException | Raised when a stack in memory overflows. |
| TimeoutException | The time interval allotted to an operation has expired. |
Every exception class in .Net is derived from the base Exception class. It includes the following important properties using which you can use to get information about the exception when you handle the exception.
| Property | Description |
|---|---|
| Message | Provides details about the cause of the exception. |
| StackTrace | Provides information about where the error occurred. |
| InnerException | Provides information about the series of exceptions that might have occurred. |
| HelpLink | This property can hold the help URL for a particular exception. |
| Data | This property can hold arbitrary data in key-value pairs. |
| TargetSite | Provides the name of the method where this exception was thrown. |
When an error occurs, either application code or the default handler handles the exception. Learn how to handle the excetion in the next section.
 Points to Remember :
- Exception is a base class for any type of exception class in C#.
- Exception types: SystemException and ApplicationException.
- SystemException class is used for CLR related runtime errors.
- Exception class includes important properties e.g Message, StackTrack, InnerException, data etc. to associate important information with every exception.
Exception Handling in C#
We have seen in the previous section that an exception is thrown by the CLR or program code if there is an error in the program. These exceptions need to be handle to prevent crashing of program. C# provides built-in support to handle the exception using try, catch & finally block.
Syntax:
try
{
    // code that may raise exceptions
}
catch(Exception ex)
{
    // handle exception
}
finally
{
    // final cleanup code
}
As per the above syntax, put the code in the try block that may raise an exception followed by a catch or finally block. Keep variable declarations out of the try block so that they can be accessed in the catch and finally blocks.
Let's see how to use try & catch block to handle the exception. Consider the following code which can raise an exception.
Example: Program throws an Exception
class Program
{
    static void Main(string[] args)
    {
        Console.Write("Enter Student Name: ");

        string studentName = Console.ReadLine();

        IList<String> studentList = FindAllStudentFromDatabase(studentName);

        Console.WriteLine("Total {0}: {1}", studentName, studentList.Count());

        Console.ReadKey();
    }

    private static IList<String> FindAllStudentFromDatabase(string studentName)
    {
        var studentList = // find all students with same name from the database

        return studentList;
    }
}
In the above example, it display total number of students with the same name. Assume that FindAllStudentFromDatabase() method gets student list with the same name from the database.
The above example will work fine if at least one student exists for the specified name, otherwise it will raise NullReferenceException. We don't want to show exception message to the user and stop the execution. So, we need to handle exception using try catch block as shown below.
Example: Exception handling using try catch block
class Program
{
    static void Main(string[] args)
    {
        Console.Write("Enter Student Name: ");

        string studentName = Console.ReadLine();

        try
        {
            IList<String> studentList = FindAllStudentFromDatabase(studentName);

            Console.WriteLine("Total {0}: {1}", studentName, studentList.Count());
        }
        catch(Exception ex)
        {
            Console.Write("No Students exists for the specified name.");
        }

        Console.ReadKey();
    }

    private static IList<String> FindAllStudentFromDatabase(string studentName)
    {
        var studentList = // find all students with same name from the database

        return studentList;
    }
}
As you can see in the above example,
studentList.Count() can raise an exception if studentList is null. So wrap this code into try block. The try block simple tells the compiler to monitor the code for an exception. Exception raised within try block must be handled using catch block.
Note:
try block must be followed by catch or finally or both blocks. The try block without a catch or finally block will give a compile time error.
Catch block:
Exception raised within try block can be handled using the catch block as shown in the above example. Code in the catch block will only execute when an exception occurs.
A multiple catch block can also be specified with a different exception type is called exception filters. A multiple catch block is useful when you want to handle different exceptions in different ways.
Example: Multiple catch block
class Program
{
    static void Main(string[] args)
    {
        Console.Write("Please enter two numbers: ");

        try
        {
            int num1 = int.Parse(Console.ReadLine());
            int num2 = int.Parse(Console.ReadLine());

            int result = num1 / num2;

            Console.WriteLine("{0} / {1} = {2}", num1, num2, result);
        }
        catch(DivideByZeroException ex)
        {
            LogError(ex);
            Console.Write("Cannot divide by zero. Please try again.");
        }
        catch(InvalidOperationException ex)
        {
            LogError(ex);
            Console.Write("Not a valid number. Please try again.");
        }
        catch(FormatException  ex)
        {
            LogError(ex);
            Console.Write("Not a valid number. Please try again.");
        }

        Console.ReadKey();
    }

}
In the above example, we have specified a multiple catch block with different exception types, so that we can display the appropriate message to the user, depending upon the error and so the user does not repeat the same mistake again.
Note:
A multiple catch block with the same exception type is not allowed. It will give a compile time error.
Invalid catch Block
Parameterless catch block and a catch block with an Exception parameter are not allowed in the same try-catch statements, because they both do the same thing.
Example: Invalid catch
try
{
    //code that may raise an exception
}
catch //cannot have both catch and catch(Exception ex)
{
    Console.WriteLine("Exception occurred");
}
catch(Exception ex) //cannot have both catch and catch(Exception ex)
{
    Console.WriteLine("Exception occurred");
}
Also, parameterless catch block
catch{ } or general catch block catch(Exception ex){ } must be the last block. The compiler will give an error if you have other catch blocks after a catch{ } or catch(Exception ex) block.
Example: Invalid catch
try
{
    //code that may raise an exception
}
catch
{
    // this catch block must be last block
}
catch (NullReferenceException nullEx)
{
    Console.WriteLine(nullEx.Message);
}
catch (InvalidCastException inEx)
{
    Console.WriteLine(inEx.Message);
}
Finally Block
The finally block must come after a try or catch block. The finally block will always be executed whether or not an exception is thrown. The finally block is generally used for cleaning-up code e.g. for disposing an unmanaged objects etc.
Example: finally block
static void Main(string[] args)
{
    int zero = 0;

    try
    {
        int result = 5/zero;  // this will throw an exception
    }
    catch(Exception ex)
    {
        Console.WriteLine("Inside catch block. Exception: {0}", ex.Message );
    }
    finally
    {
        Console.WriteLine("Inside finally block.");
    }
}
Output:
Inside catch block. Exception: Attempted to divide by zero.Inside finally
Note:
Multiple finally blocks are not allowed. Also, the finally block cannot have the return, continue, or break keywords. It doesn't allow control to leave the finally block.
Nested try-catch
C# allows nested try catch blocks. In the nested try catch block, an exception will be caught in the catch block that follows the try block where an exception occurred.
Example: Nested try-catch
static void Main(string[] args)
{
    Student std = null;

    try
    {
        try
        {
            std.StudentName = "";
        }
        catch
        {
            Console.WriteLine("Inner catch");
        }
    }
    catch
    {
        Console.WriteLine("Outer catch");
    }
}
Output:
Inner catch
If there isn't any inner catch block with appropriate exception type, then exception will flow to the outer catch block until it finds the appropriate exception filter. Consider the following example.
Example: Nested try-catch
static void Main(string[] args)
{
    Student std = null;

    try
    {
        try
        {
            // following throws NullReferenceException
            std.StudentName = "";
        }
        catch (InvalidOperationException innerEx)
        {
            Console.WriteLine("Inner catch");
        }
    }
    catch
    {
        Console.WriteLine("Outer catch");
    }
}
Output:
Outer catch
In the above example,
std.StudentName will raise a NullReferenceException, but there is not any catch block that handles NullReferenceException or Exception type. So, it will be handled by the outer catch block. Points to Remember :- Use the try, catch and finally blocks to handle exceptions in C#.
- The try block must be followed by a catch or finally block or both.
- A multiple catch block is allowed with different exception filters. General catch{..} block must come last.
catch{..}andcatch(Exception ex){ }both cannot be used.- The finally block must come after the try or catch block.
- The finally block will always execute irrespective of whether an exception occured or not.
- The finally block is appropriate place for disposing objects.
- The finally block cannot have a return or break because it isn't allow to leave the control.
- Nested try-catch blocks are allowed in C#.
- An Exception will be catched in the inner catch block if appropriate filter found, otherwise will be catched by outer catch block.
Learn how to raise an exception manually in the next section.
C# - throw keyword
We have seen in the previous section how to handle exceptions which are automatically raised by CLR. Here, we will see how to raise an exception manually.
An exception can be raised manually by using the throw keyword. Any type of exceptions which is derived from Exception class can be raised using the throw keyword.
Example: throw an exception
static void Main(string[] args)
{
    Student std = null;

    try
    {
        PrintStudentName(std);
    }
    catch(Exception ex)
    {
        Console.WriteLine(ex.Message );
    }

    Console.ReadKey();
}

private static void PrintStudentName( Student std)
{
    if (std  == null)
        throw new NullReferenceException("Student object is null.");

    Console.WriteLine(std.StudentName);
}
Output:
Student object is null.
In the above example, PrintStudentName() method raises NullReferenceException if Student object is null.
Please notice that throw creates an object of any valid exception type using the new keyword. The throw keyword cannot be used with any other type which does not derive from the Exception class.
Re-throwing an Exception
You can also re-throw an exception from the catch block to pass on to the caller and let the caller handle it the way they want. The following example re-throws an exception.
Example: throw an exception
static void Main(string[] args)
{
    try
    {
        Method1();
    }
    catch(Exception ex)
    {
        Console.WriteLine(ex.StackTrace);
    }
}

static void Method1()
{
    try
    {
        Method2();
    }
    catch(Exception ex)
    {
        throw;
    }
}

static void Method2()
{
    string str = null;
    try
    {
        Console.WriteLine(str[0]);
    }
    catch(Exception ex)
    {
        throw;
    }
}
In the above example, an exception occurs in Method2(). The catch block simply throws that exception using only throw keyword (not throw e). This will be handled in catch block in Method1() where it again re-throw the same exception and finally it is being handled in the Main() method. The stack trace of this exception will give you the full detail of where exactly this exception occurred.
If you re-throw an exception using exception parameter then it will not preserve the original exception and creates a new exception. The following example demonstrates this.
Example: throw an exception
static void Main(string[] args)
{
    try
    {
        Method1();
    }
    catch(Exception ex)
    {
        Console.WriteLine(ex.StackTrace);
    }
}

static void Method1()
{
    try
    {
        Method2();
    }
    catch(Exception ex)
    {
        throw ex;
    }
}

static void Method2()
{
    string str = null;
    try
    {
        Console.WriteLine(str[0]);
    }
    catch(Exception ex)
    {
        throw;
    }
}
In the above example, exception caught in the Main() method will display stack trace from Method1 and Main method. It will not display Method1 in stack trace as we re-throw exception in Method1() using
throw ex. So, never throw an exception using throw <exception parameter>.
Learn how to create custom exception type in the next section.
Create Custom Exception Class in C#
We have seen built-in exception classes in the previous section. However, you often like to raise an exception when the business rule of your application gets violated. So, for this you can create a custom exception class by deriving Exception or ApplicationException class.
The .Net framework includes ApplicationException class since .Net v1.0. It was designed to use as a base class for the custom exception class. However, Microsoft now recommends Exception class to create a custom exception class.
For example, create InvalidStudentNameException class in a school application, which does not allow any special character or numeric value in a name of any of the students.
Example: ApplicationException
class Student
{
    public int StudentID { get; set; }
    public string StudentName { get; set; }
}

[Serializable]
class InvalidStudentNameException : Exception
{
    public InvalidStudentNameException()
    {

    }

    public InvalidStudentNameException(string name)
        : base(String.Format("Invalid Student Name: {0}", name))
    {

    }

}
Now, you can raise
InvalidStudentNameException in your program whenever the name contains special characters or numbers. Use the throw keyword to raise an exception.
Example: throw custom exception
class Program
{
    static void Main(string[] args)
    {
        Student newStudent = null;

        try
        {
            newStudent = new Student();
            newStudent.StudentName = "James007";

            ValidateStudent(newStudent);
        }
        catch(InvalidStudentNameException ex)
        {
            Console.WriteLine(ex.Message );
        }


        Console.ReadKey();
    }

    private static void ValidateStudent(Student std)
    {
        Regex regex = new Regex("^[a-zA-Z]+$");

        if (!regex.IsMatch(std.StudentName))
             throw new InvalidStudentNameException(std.StudentName);

    }
}
Output:
Invalid Student Name: James000
Thus, you can create custom exception classes to differentiate from system exceptions.


No comments:
Post a Comment