Consume Web API Get method in ASP.NET MVC
We created Web API and implemented various Get methods to handle different HTTP GET requests in the Implement Get Method section. Here we will consume one of those Get methods named
GetAllStudents() shown below.
Example: Sample Web API
public class StudentController : ApiController
{
    public StudentController()
    {
    }

    public IHttpActionResult GetAllStudents(bool includeAddress = false)
    {
        IList<StudentViewModel> students = null;

        using (var ctx = new SchoolDBEntities())
        {
            students = ctx.Students.Include("StudentAddress").Select(s => new StudentViewModel()
            {
                Id = s.StudentID,
                FirstName = s.FirstName,
                LastName = s.LastName,
                Address = s.StudentAddress == null || includeAddress == false ? null : new AddressViewModel()
                {
                    StudentId = s.StudentAddress.StudentID,
                    Address1 = s.StudentAddress.Address1,
                    Address2 = s.StudentAddress.Address2,
                    City = s.StudentAddress.City,
                    State = s.StudentAddress.State
                }
            }).ToList<StudentViewModel>();
        }

        if (students.Count == 0)
        {
            return NotFound();
        }

        return Ok(students);
    }
}
The above
GetAllStudents() action method will handle HTTP GET request http://localhost:64189/api/student and will return a list of students. We will send this HTTP request in the ASP.NET MVC controller to get all the student records and display them in the MVC View. The view will look like below.
The following is a Web API + MVC project structure created in the previous sections. We will add necessary classes in this project.
We have already created the following StudentViewModel class under Models folder.
Example: Model Class
public class StudentViewModel
{
    public int Id { get; set; }
    public string FirstName { get; set; }
    public string LastName { get; set; }

    public AddressViewModel Address { get; set; }

    public StandardViewModel Standard { get; set; }
}
Let's consume above Web API into ASP.NET MVC application step by step.
Step 1:
First of all, create MVC controller class called
StudentController in the Controllers folder as shown below. Right click on the Controllers folder > Add.. > select Controller..
Example: MVC Controller
public class StudentController : Controller
{
    // GET: Student
    public ActionResult Index()
    {
        return View();
    }
}
Step 2:
We need to access Web API in the Index() action method using HttpClient as shown below. Learn about HttpClient in detail here.
Example: MVC Controller
public class StudentController : Controller
{
    // GET: Student
    public ActionResult Index()
    {
        IEnumerable<StudentViewModel> students = null;

        using (var client = new HttpClient())
        {
            client.BaseAddress = new Uri("http://localhost:64189/api/");
            //HTTP GET
            var responseTask = client.GetAsync("student");
            responseTask.Wait();

            var result = responseTask.Result;
            if (result.IsSuccessStatusCode)
            {
                var readTask = result.Content.ReadAsAsync<IList<StudentViewModel>>();
                readTask.Wait();

                students = readTask.Result;
            }
            else //web api sent error response
            {
                //log response status here..

                students = Enumerable.Empty<StudentViewModel>();

                ModelState.AddModelError(string.Empty, "Server error. Please contact administrator.");
            }
        }
        return View(students);
    }
}
Step 3:
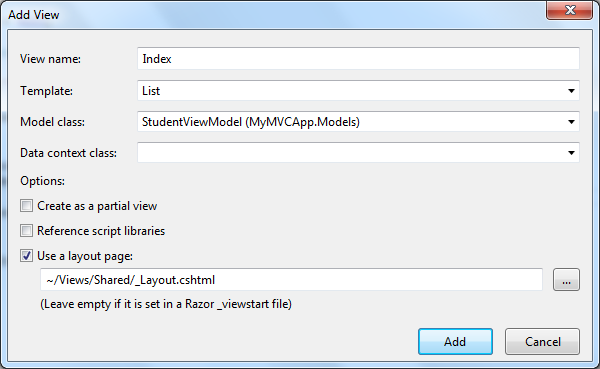
Now, we need to add Index view. Right click in the Index action method and select Add View.. option. This will open Add View popup as shown below. Now, select List as template and StudentViewModel as Model class as below (we already created StudentViewModel in the previous section).
Click Add to add Index view in the Views folder. This will generate following Index.cshtml.
Index.cshtml
@model IEnumerable<WebAPIDemo.Models.StudentViewModel>

@{
    ViewBag.Title = "Index";
    Layout = "~/Views/Shared/_Layout.cshtml";
}

<h2>Index</h2>

<p>
    @Html.ActionLink("Create New", "Create")
</p>
<table class="table">
    <tr>
        <th>
            @Html.DisplayNameFor(model => model.FirstName)
        </th>
        <th>
            @Html.DisplayNameFor(model => model.LastName)
        </th>
    <th></th>
    </tr>

    @foreach (var item in Model) {
        <tr>
            <td>
                @Html.DisplayFor(modelItem => item.FirstName)
            </td>
        <td>
            @Html.DisplayFor(modelItem => item.LastName)
        </td>
        <td>
            @Html.ActionLink("Edit", "Edit", new { id=item.Id }) |
            @Html.ActionLink("Details", "Details", new { id=item.Id }) |
            @Html.ActionLink("Delete", "Delete", new { id=item.Id })
        </td>
        </tr>
    }

</table>
Remove Details link from the View because we will not create Details page here.
Now, run the application and you will see list of students in the browser as shown below.
Display Error
We have successfully displayed records in the view above but what if Web API returns error response?
To display appropriate error message in the MVC view, add the ValidationSummary() as shown below.
Index.cshtml
@model IEnumerable<WebAPIDemo.Models.StudentViewModel>

@{
    ViewBag.Title = "Index";
    Layout = "~/Views/Shared/_Layout.cshtml";
}

<h2>Index</h2>

<p>
    @Html.ActionLink("Create New", "Create")
</p>
<table class="table">
    <tr>
        <th>
            @Html.DisplayNameFor(model => model.FirstName)
        </th>
        <th>
            @Html.DisplayNameFor(model => model.LastName)
        </th>
    <th></th>
    </tr>

    @foreach (var item in Model) {
        <tr>
            <td>
                @Html.DisplayFor(modelItem => item.FirstName)
            </td>
            <td>
                @Html.DisplayFor(modelItem => item.LastName)
            </td>
            <td>
                @Html.ActionLink("Edit", "Edit", new { id=item.Id }) |
                @Html.ActionLink("Delete", "Delete", new { id=item.Id })
            </td>
        </tr>
    }
    <tr>
        <td>
            @Html.ValidationSummary(true, "", new { @class = "text-danger" })
        </td>
    </tr>

</table>
In the above view, we have added
@Html.ValidationSummary(true, "", new { @class = "text-danger" }) in the last row of the table. This is to display error message if Web API returns error response with the status other than 200 OK.
Please notice that we have added model error in the Index() action method in StudentController class created in the step 2 if Web API responds with the status code other than 200 OK.
So now, if Web API returns any kind of error then Student List view will display the message below.
In the next section, we will consume Post method to create a new record in the underlying data source by clicking on Create New link in the above view.


No comments:
Post a Comment