Create Web API for CRUD operation - Part 1
Here we will create a new Web API project and implement GET, POST, PUT and DELETE method for CRUD operation using Entity Framework.
First, create a new Web API project in Visual Studio 2013 for Web express edition.
Open Visual Studio 2013 for Web and click on File menu -> New Project.. This will open New Project popup as shown below.
In the New Project popup, select Web template under Visual C#. Enter project name WebApiDemo and the location where you want to create the project. Click OK to continue. This will open another popup to select a project template. Select Web API project as shown below.
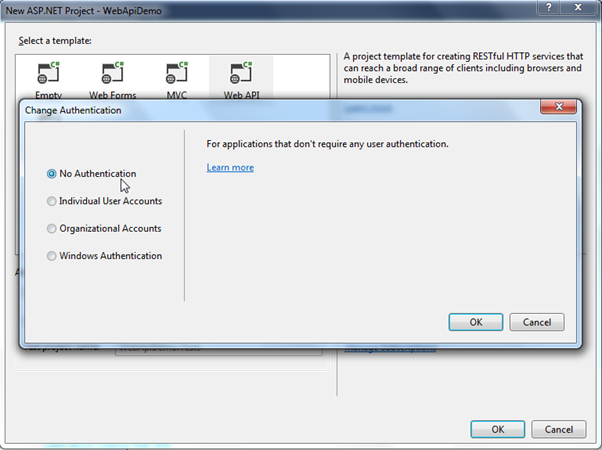
Here, we are not going to use any authentication in our demo project. So, click on Change Authentication button to open Authentication popup and select No Authentication radio button and then click OK as shown below.
Now, click OK in New ASP.NET Project popup to create a project as shown below.
As you can see, a new WebApiDemo project is created with all necessary files. It has also added default ValuesController. Since, we will be adding our new Web API controller we can delete the default ValuesController.
Here, we are going to use Entity Framework DB-First approach to access an existing school database. So, let's add EF data model for the school database using DB First approach.
Add Entity Framework Data Model
To add EF data model using DB-First approach, right click on your project -> click New Item.. This will open Add New Item popup as shown below.
Select Data in the left pane and select ADO.NET Entity Data Model in the middle pane and enter the name of a data model and click Add. This will open Entity Data Model Wizard using which you can generate Entity Data Model for an existing School database. The scope of the topic is limited to Web API so we have not covered how to generate EDM. Learn about it here.
EntityFramework will generate following data model after completing all the steps of Entity Data Model Wizard.
Entity Framework also generates entities and context classes as shown below.
Now, we are ready to implement CRUD operation using Entity Framework in our Web API project. Now, let's add a Web API controller in our project.
Add Web API Controller
To add a Web API controller in your MVC project, right click on the Controllers folder or another folder where you want to add a Web API controller -> select Add -> select Controller. This will open Add Scaffold popup as shown below.
In the Add Scaffold popup, select Web API in the left pane and select Web API 2 Controller - Empty in the middle pane and click Add. (We select Empty template as we plan to add action methods and Entity Framework by ourselves.)
This will open Add Controller popup where you need to enter the name of your controller. Enter "StudentController" as a controller name and click Add as shown below.
This will add empty StudentController class derived from ApiController as shown below.
Web API Controller
using System;
using System.Collections.Generic;
using System.Linq;
using System.Net;
using System.Net.Http;
using System.Web.Http;

namespace MyMVCApp.Controllers
{
    public class StudentController : ApiController
    {

    }
}
We will implement GET, POST, PUT and DELETE action methods in this controller in the subsequent sections.
Add Model
We will be accessing underlying database using Entity Framework (EF). As you have seen above, EF creates its own entity classes. Ideally, we should not return EF entity objects from the Web API. It is recommended to return DTO (Data Transfer Object) from Web API. As we have created Web API project with MVC, we can also use MVC model classes which will be used in both MVC and Web API.
Here, we will return Student, Address and Standard from our Web API. So, create StudentViewModel, AddressViewModel and StandardViewModel in the Models folder as shown below.
The followings are model classes.
Model Classes
public class StudentViewModel
{
    public int Id { get; set; }
    public string FirstName { get; set; }
    public string LastName { get; set; }

    public AddressViewModel Address { get; set; }
    public StandardViewModel Standard { get; set; }
}

public class StandardViewModel
{
    public int StandardId { get; set; }
    public string Name { get; set; }

    public ICollection<StudentViewModel> Students { get; set; }
}

public class AddressViewModel
{
    public int StudentId { get; set; }
    public string Address1 { get; set; }
    public string Address2 { get; set; }
    public string City { get; set; }
    public string State { get; set; }
}
Note: ViewModel classes or DTO classes are just for data transfer from Web API controller to clients. You may name it as per your choice.
Now, let's implement Get methods to handle various HTTP GET requests in the next section.


No comments:
Post a Comment